How To Use HubSpot: A Practical Guide to Transforming Your Business
HubSpot is more than just a CRM. It’s a strategic growth platform that, when used correctly, can transform how you generate leads, manage deals,...

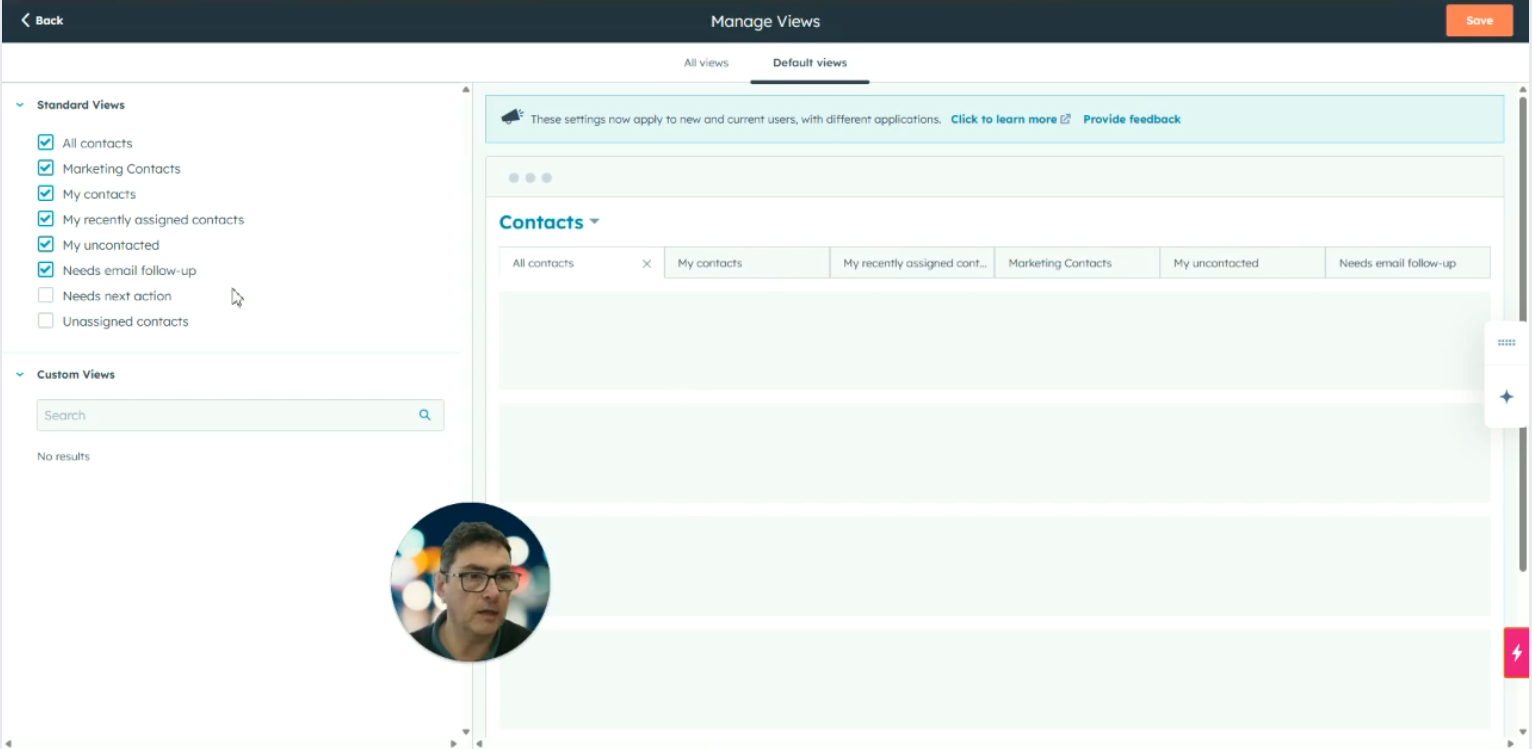
Customizing CRM contact tabs helps streamline your workflow by letting you add, reorder, and manage views— ensuring the most relevant contact data is always front and centre for your team.
Access the CRM Interface
Open the CRM and navigate to the Contacts section, where tabs are visible along the top of the screen.
Enter the Settings Menu
Click on the Settings button located at the top of the interface.
Note: You must have super user access to proceed with these changes.
Navigate to Object Settings
Within the settings menu, go to Object and select Contact from the list.
Open Index Customization
Click on the Index Customization tab.
Choose “All Views”
Within Index Customization, select the All Views section to see all available tab views.
Modify Default Tabs
Review the list of currently active default tabs.
To add new tabs:
Select any additional views you want from the available list.
They will be added to the end of the tab row.
Reorder Tabs
After adding tabs, drag and drop them into the desired order to suit your organization’s preferences.
Save Your Changes
Click Save to apply your customizations to the contact tabs.
Explore Other Objects (Optional)
If needed, repeat the same process for other object types like:
Companies
Deals
Or any other indexed areas in your CRM.
Review the New Setup
Return to the Contacts screen.
Verify that the newly added and reordered tabs are now visible at the top of the page.
Hi, I'm Andrew Turner from Cogent Connective, and, what we're going to be looking at just now is, contacts, which are found on CRM and looking at these tabs that you have along the top here. Sometimes, organizations, prefer to add their own tabs, which, anyone can go and take a look at. So, what we're going to do here is just look at the setup procedure for making the default tabs or changing the default tabs that are available for everybody.
So, starting point is we'll go and click on the settings button at the top here. You need to be a super user to be able to do this, by the way. But, once you've got those credentials, then, this is no problem at all. So, we go to object and select contact. Then we go to this tab here, index customization. and then we'll go to all views and we'll go and take a look at the default views So as you can see, those are the three tabs that were, initially set up. And these are the tabs that are, views rather that are, also available. So, you can just add those in. Select a couple here, and they get added to the end. And you can move them around, so, you can have them in whatever order you want.
Another element that's worth just considering is within this view here and we'll just save that actually. You can actually go in and look at companies, you can look at deals, you can look at all the other index areas, where you might want to make changes to the, to the tabs that you've got available, So, we'll just come out of there, go back, and we're just going to have a look at our contacts. And there you can see all the new tabs that have, been added to the top. So that's another win. Thank you very much. Enjoy your day. Bye.
Here's some others we think you'll love
HubSpot is more than just a CRM. It’s a strategic growth platform that, when used correctly, can transform how you generate leads, manage deals,...
You know you need a better way to manage key accounts. Right now, it's ad hoc, reactive, and inconsistent. One customer gets great service because...

Understanding the Reasons Behind Procrastination Procrastination often stems from a fear of change or uncertainty about the future. Many individuals...